PUMP DESIGN FOR R134A
Boston University | Candidate for M.S. in Product Design & Manufacture | Fall 2023

OBJECTIVE
I worked as part of a team of three to design a rotary vane pump for R134A (refrigerant) as our end of semester project. The project included mechanical design, CAD, material selection, lifetime calculations, and costing and manufacturing analysis.
SKILLS SNAPSHOT
DFM/ DFA
ONSHAPE
COST ANALYSIS
MATERIAL SELECTION
TOLERANCE ANALYSIS
BOLT CALCULATIONS
FAILURE CALCULATIONS
MECHANICAL DRAWINGS
GD&T
DESIGN STEPS
I broke out all the necessary tasks into project stages to ensure we had enough time to receive feedback and adapt accordingly throughout the semester. Tasks were bucketed as follows:
-
Preliminary Design and CAD:
-
Learn Onshape for the first time
-
Team consensus on initial design
-
Part and assembly CAD for 7 designed parts and all COTS hardware
-
-
Initial Material Selection:
-
Material selection comparisons in ANSYS Granta Edupack for all 7 designed parts
-
-
Tolerance Stacks:
-
RSS tolerance calculations for critical fits (eg: sliding fit of vane in rotor slot, gap between rotor and ID of housing, and compression of gasket)
-
-
Preliminary Drawings:
-
Create engineering drawings for 7 designed parts with appropriate tolerances, notes, revision tables
-
Set up a design review with the professor
-
-
Initial Cost Analysis:
-
Part cost analyses of 7 designed parts across multiple manufacturing regions
-
Assembly cost analyses
-
Identify potential cost down opportunities without compromising functionality
-
-
Secondary Design:
-
Make design changes according to design review feedback, material properties, and cost analysis
-
-
Secondary Cost Analysis:
-
Update part and cost analyses according to design changes
-
Confirm cost reductions or justify cost increases with improved functionality or reliability
-
-
Final Drawings:
-
Update all drawings with final design, tolerances, and material selections
-
Uprev all parts and ensure the revision table reflects part history.
-
-
Final Deliverables:
-
Export CAD package (parts, assemblies, drawings)
-
Create and practice the final presentation as a team
-
Organize and submit all engineering calculations, cost analyses, and COTS data sheets
-
The working pump: R134A enters via the inlet at the left, and exits via the teardrop outlet at the right

Material Selection Step 1:
I compared the most important properties for a given part in ANSYS Granta. In this case, I compared price and thermal expansion coefficient for the front plate

Material Selection Step 2:
I created a formatted table the team was able to use to compare candidate materials for each part. After identifying a few promising materials in ANSYS Granta, material properties could be fed into each table and ranked accordingly. For example, this table ranks for lowest price and highest hardness.
RESULTS
-
The design was presented to the class, and the team's design decisions and compromises were justified
-
The project received an A!
-
My teammates elected to grade my effort at 120% as part of the peer review process
-
One teammate (Adam Steinhilber) endorsed my work by providing a recommendation on my LinkedIn
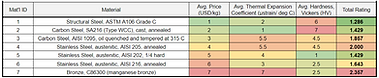
Material Selection Step 3:
Assuming we care about each selection quality equally, the candidate materials ranked overall. In this case, material 1- the structural steel- was selected for the front plate because it scored the highest across price, thermal expansion coefficient, and hardness combined.

My final cost analysis: I became the team's aPriori expert, and ran between 40-50 cost analyses throughout the design process. These figures are for the final assembly, designed to cost and with packaging included. They reflect manufacturing in India with scrap credits accounted for.
Unfortunately, the educational aPriori license does not include the ability to calculate shipping costs. I would have liked to compare the cost of manufacture + ship from India vs. manufacture + ship from Mexico, nearer our imagined client in Arizona.
Our final presentation slides